A Complete Guide to Wallpaper Installation for Beginners
The thought of installing wallpaper can be intimidating. Visions of crooked seams, air bubbles, and messy glue can make even the most enthusiastic DIYer hesitant. But the truth is, with the right preparation and a little patience, a professional-looking wallpaper installation is not only possible but also a deeply satisfying project. This complete guide will walk you through every step of the process, proving that anyone can master the art of DIY wallpaper
WALLPAPER
8/2/20253 min read

Gathering Your Essential Wallpaper Tools
Before you start, having the right equipment is non-negotiable. A well-stocked toolkit will make the job infinitely easier and ensure a flawless finish. Here is a checklist of the essential wallpaper tools you’ll need:
Measuring Tape: For accurately measuring your walls and cutting strips.
Utility Knife with Spare Blades: A sharp blade is crucial for clean cuts; dull blades will tear the paper.
Level and Pencil: To draw a straight vertical line to guide your first strip. This is the most important step for a straight installation.
Smoother/Squeegee: A plastic smoothing tool or wallpaper brush to remove air bubbles and creases.
Seam Roller: To flatten the seams between strips for a seamless look.
Bucket and Sponge: For cleaning up excess paste and wiping down the paper.
Drop Cloth: To protect your floor from paste and water.
Ladder or Step Stool: For reaching the top of the wall.
If you are using non-pasted wallpaper, you will also need:
Wallpaper Adhesive: A tub of ready-to-use wallpaper adhesive and a paste brush or roller.
If you are using prepasted wallpaper, you will need:
Water Tray: A long, shallow tray to soak the wallpaper and activate the adhesive.
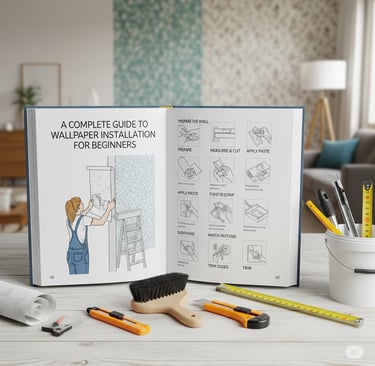
Step-by-Step Wallpaper Installation
This is the core of how to hang wallpaper. Follow these steps carefully to ensure a smooth process from start to finish.
Prepping the Wall: This step is crucial for a lasting finish. Start by cleaning your wall with a damp sponge to remove any dust or dirt. Fill any holes or cracks with spackle and sand the surface smooth. For a smooth application, it's highly recommended to apply a coat of primer specifically designed for wallpaper. This creates a uniform surface and makes the paper easier to remove later on.
Cutting the Paper: Unroll your wallpaper and measure the height of your wall. Add an extra 2-4 inches to the top and bottom of each strip for trimming. For patterned wallpaper, make sure to match the pattern from one strip to the next before you cut. This is a critical step to ensure a continuous design.
Applying Wallpaper Adhesive (or Activating Prepasted Paper):
For non-pasted paper: Lay your cut strip face down on a clean drop cloth. Use a paste brush or roller to apply a thin, even layer of wallpaper adhesive to the back of the paper, covering every edge. Fold the strip loosely (paste side to paste side) and let it "book" for a few minutes. This allows the paste to set and the paper to become more pliable.
For prepasted paper: Roll the cut strip face-in and submerge it in a water tray for the recommended amount of time (usually about 30 seconds). The water activates the adhesive on the back of the paper.
Hanging and Smoothing the Strips:
Using your pencil and level, draw a straight vertical line where your first strip will go. This line is your guide and will determine the straightness of the entire project.
Carefully position the top of your first strip along the ceiling, aligning the edge with your pencil line.
Smooth the paper down the wall using your smoother or brush, working from the center outward to push out any air bubbles.
Trim the excess paper at the top and bottom using your utility knife and a straight edge for a clean, crisp cut.
For the next strip, repeat the process, but this time align the edge of the new strip to the previous one, carefully matching the pattern. Use your seam roller to gently press down the seam for a tight, invisible finish.
Common Mistakes to Avoid
Even with the best instructions, beginners can run into a few common issues. Here’s how to troubleshoot them:
Crooked First Strip: If your first strip is not perfectly vertical, the rest of your installation will be crooked. Take the time to measure and use your level. It's the most important step for a successful DIY wallpaper project.
Air Bubbles: Small bubbles are common. Use your smoother to gently push the air out towards the nearest edge. If you find a stubborn bubble, you can carefully pierce it with a pin and smooth it out.
Tearing the Paper: This is often a result of using a dull utility knife. Change your blade frequently to ensure clean, smooth cuts, especially around edges and corners.
Conclusion
With these steps and a little practice, you can confidently take on your next wallpaper installation. The secret to a beautiful, long-lasting finish is in the preparation and taking your time. You've now learned how to hang wallpaper and what tools are needed to get the job done right. Don't be afraid to add a unique touch to your home—that professional-looking accent wall is just a few steps away!
Quality
Your trusted partner for all printing needs.
Contact
Follow
+918433506353
© 2025 Digambar Prints. All rights reserved. digambarprints.in Email: support@digambarprints.in